
Homogenizer pressure has a major effect on dairy product stability, texture, and appearance—but there is no single pressure setting that works for every product.
Pressure is only a processing tool. The correct setting depends on what problem you are trying to solve, what product you are making, how the material behaves, and how the homogenizer is actually running.
For plain pasteurized milk, a practical starting point may be around 15–20 MPa on the first stage and 3–5 MPa on the second stage, but this should be treated as a commissioning starting point rather than a universal standard. Confirm where each pressure is measured: an upstream gauge reading and the pressure drop across a stage are different values. Follow the machine’s pressure diagram when recording or comparing settings.

A better adjustment process is:
Identify the product problem → Confirm product characteristics → Check machine condition → Set a baseline → Adjust pressure gradually → Record the result
That is much more reliable than simply increasing pressure until the product looks smoother.
What Should You Check Before Adjusting Homogenizer Pressure?
Before touching the pressure setting, first ask:
What problem are we actually trying to solve?
The customer may be seeing:
- Cream separation
- Unstable emulsion
- Poor mouthfeel
- Inconsistent viscosity
- Product sedimentation
- Excessive foaming
- Filling instability
- Yogurt graininess
- Batch-to-batch variation
Pressure should be adjusted only after the actual product problem is clear.
A practical troubleshooting order is:
- Confirm the final product problem
- Confirm product type and material characteristics
- Check homogenizer condition and existing settings
- Check operating temperature and product flow
- Adjust pressure gradually
- Evaluate the finished product again
This prevents operators from changing pressure when the real problem may be somewhere else in the process.
There Is No Universal “Best” Homogenizer Pressure
A homogenizer used for pasteurized milk does not necessarily need the same pressure as one processing yogurt mix, flavored milk, or another dairy beverage.
The correct setting depends on factors such as:
- Fat content
- Protein content
- Total solids
- Product temperature
- Product viscosity
- Stabilizers or added ingredients
- One-stage or two-stage homogenization
- Desired shelf stability
- Final texture
- Downstream processing
That is why we normally explain it this way:
Pressure is the means, not the goal. First define what the product needs to withstand, then work backward to the pressure setting.
Running at the highest available pressure does not automatically produce the best product.
It may only increase:
- Equipment load
- Energy consumption
- Valve wear
- Heat generation
- Maintenance demand
without solving the original problem.
What Is a Good Starting Pressure for Pasteurized Milk?
For ordinary pasteurized milk, a practical commissioning starting point can be:
| Stage | Practical Starting Point |
|---|---|
| First Stage | 15–20 MPa |
| Second Stage | 3–5 MPa |
These numbers are starting points, not fixed standards.
The final setting should still be adjusted according to:
- Milk composition
- Homogenization temperature
- Product stability
- Fat separation
- Equipment design
- Homogenizing valve condition
The first stage normally performs most of the actual particle and fat-globule size reduction.
The second stage plays a different role.
Why Use Two-Stage Homogenization?
Two-stage homogenization is especially useful in dairy processing because the two stages do not perform exactly the same job.
First Stage
The first stage carries most of the pressure drop.
Its main purpose is to:
- Reduce fat globule size
- Break larger dispersed particles
- Create a finer and more uniform emulsion
This is where most of the actual homogenization takes place.
Second Stage
The second stage is not simply “another first stage.”
Its role is more about stabilizing the result.
It can help:
- Provide controlled back pressure
- Break up clusters formed after the first stage
- Reduce re-agglomeration
- Improve particle-size distribution
- Reduce hydraulic instability and vibration
A simple way to understand it is:
Stage 1 creates the fine dispersion. Stage 2 helps keep that dispersion stable.
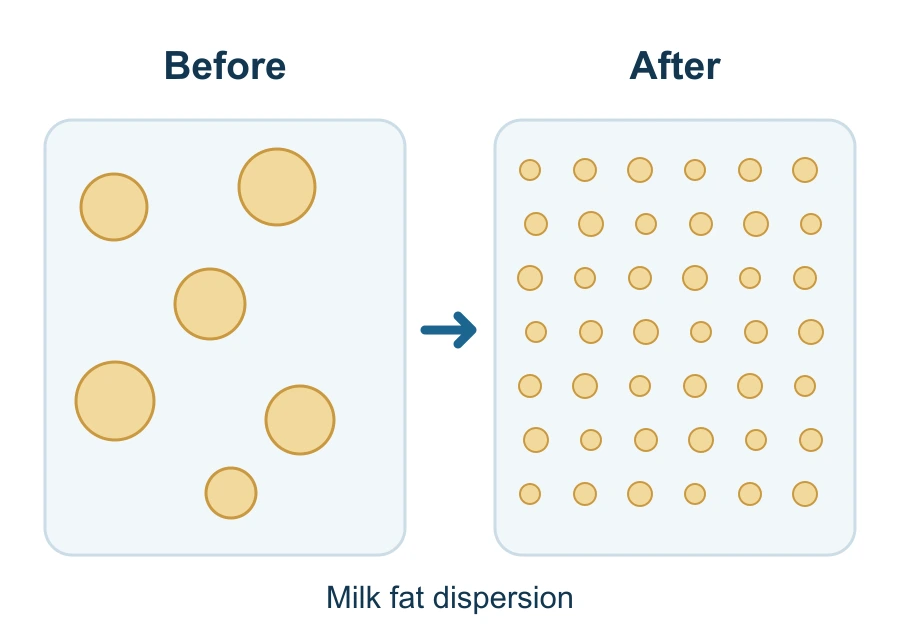
Single-stage homogenization can work in some small dairy lines.
But for dairy products where more adjustment flexibility and stable product quality are required, two-stage homogenization is often easier to control.
What Should You Check When Milk Still Shows Cream Separation?
If cream or fat separation appears after storage, do not immediately increase the pressure.
The better approach is to troubleshoot in sequence.
1. Check Actual Pressure and Pressure Stability
Start with the pressure gauge and operating behavior.
Ask:
- Is the actual pressure reaching the set point?
- Is the pressure stable?
- Does it fluctuate during production?
- Does pressure drop as flow changes?
A machine set to 18 MPa is not actually operating at 18 MPa if the pressure is constantly fluctuating.
2. Check Homogenizing Valve and Seal Wear
Mechanical wear can reduce homogenization performance even when the gauge still appears normal.
Inspect:
- Homogenizing valve
- Valve seat
- Seals
- High-pressure components
- Product leakage
A worn valve may produce poor results without an obvious electrical fault.
3. Check Feed Temperature and Flow Condition
Milk entering the homogenizer under unsuitable temperature or unstable flow conditions may respond differently even at the same pressure.
Check:
- Feed temperature
- Flow stability
- Pumping condition
- Air entering the product line
- Whether the homogenizer is fully flooded with product
4. Check First-Stage and Second-Stage Pressure Balance
On a two-stage homogenizer, the total pressure alone does not tell the full story.
The first and second stages need to work together.
If the pressure split is poorly adjusted, the product may not achieve the expected particle distribution or stability.
5. Check Milk Standardization
If the homogenizer itself appears normal, review:
- Fat content
- Protein content
- Fat-to-protein relationship
- Added ingredients
- Standardization consistency
A process problem cannot always be corrected by increasing homogenization pressure.
6. Check Upstream and Downstream Processing
Finally, review the surrounding line.
For example:
- Was the product stored too long before homogenization?
- Was temperature control unstable?
- Was there excessive air incorporation?
- Did downstream heating or cooling change the product?
- Is storage temperature correct?
Homogenization is one part of the process—not the entire process.
Does High Homogenizer Pressure Always Cause Fat Separation?
No.
This is an important correction.
Homogenization is normally used specifically to reduce fat globule size and improve emulsion stability.
So if a product develops fat separation, it is too simple to say:
The homogenizer pressure was too high.
The actual cause may involve:
- Insufficient pressure
- Unstable pressure
- Poor homogenizer condition
- Incorrect temperature
- Improper two-stage pressure balance
- Product formulation
- Protein-to-fat balance
- Upstream processing
- Storage conditions
Higher pressure can change product structure and increase equipment load, but there is no single pressure threshold where milk suddenly becomes unstable.
The whole process needs to be evaluated.
What About Foam and Micro-Bubbles?
Foam is another problem that is often blamed too quickly on the homogenizer.
A homogenizer creates high velocity, turbulence, and pressure drop inside the valve.
But persistent foam in a dairy line may also come from:
- Air leaks on the suction side
- Poor pump inlet conditions
- Excessive tank agitation
- Product falling into a tank from height
- Return-line design
- Pipe connections
- Incomplete deaeration
- Unstable product flow

If foam appears after changing pressure, the homogenizer should certainly be checked.
But the correct troubleshooting question is:
Where is the air entering the product?
not simply:
Is the pressure too high?
This matters because reducing homogenizer pressure will not solve a leaking pump seal or an upstream air-ingress problem.
How Should Homogenizer Pressure Be Set for Yogurt?
Yogurt is more complicated than plain milk because final texture depends on several interacting factors.
These include:
- Milk composition
- Total solids
- Protein level
- Stabilizer system
- Homogenization
- Heat treatment
- Starter culture
- Fermentation temperature
- Fermentation endpoint
- Cooling method
- Post-fermentation shear
For this reason, there should not be one universal yogurt pressure such as:
“Never exceed 20 MPa.”
That rule is too simple.
The homogenizer setting should be evaluated together with the complete yogurt process.

If yogurt becomes grainy, flaky, thin, or unstable, the homogenizer is not automatically the first suspect.
A practical troubleshooting order is:
- Fermentation and starter culture
- Total solids, formulation, and stabilizers
- Heat treatment
- Cooling and post-fermentation shear
- Homogenization conditions
That order prevents unnecessary pressure adjustments when the root cause is actually fermentation or formulation.
Should Yogurt Homogenizer Pressure Be Adjusted Together With Temperature?
Yes.
Pressure should never be evaluated completely separately from product temperature.
Temperature affects:
- Fat phase condition
- Product viscosity
- Homogenization behavior
- Valve load
- Final dispersion
For yogurt milk, there is no single temperature-and-pressure combination that fits every formulation.
If the product formulation changes, the best homogenization condition may also change.
This is especially important when processing:
- High-solids yogurt
- High-fat yogurt
- Stabilized yogurt
- Flavored yogurt
- Drinking yogurt
So the better operating philosophy is:
Control temperature first, establish stable flow, then adjust pressure within a sensible range and evaluate the finished product.
How Do You Know Whether Homogenizer Pressure Is Too Low?
Pressure may be too low when you see problems such as:
- Rapid cream separation
- Poor emulsion stability
- Visible fat layer
- Large fat globules
- Inconsistent mouthfeel
- Poor product uniformity
But even these symptoms should be checked against machine condition and product formulation before pressure is increased.
If the homogenizing valve is already worn, increasing the set pressure may simply hide the mechanical problem temporarily.
How Do You Know Whether Pressure Is Higher Than Necessary?
The question should not be:
Is this pressure dangerous?
A better question is:
Are we using more pressure than the product needs?
Signs that pressure may be unnecessarily high include:
- No further improvement in product stability
- Higher power consumption
- Increased homogenizing-valve wear
- Higher operating temperature
- Increased equipment load
- Reduced maintenance interval
Once product quality has reached the required target, additional pressure may provide little benefit.
This is why commissioning should always include product evaluation—not just pressure-gauge readings.
A Practical On-Site Homogenizer Pressure Adjustment SOP
Instead of using one universal pressure table, use a controlled adjustment process.
Step 1: Define the Product Problem
Before changing anything, clearly identify the target.
For example:
- Reduce cream separation
- Improve mouthfeel
- Stabilize a beverage
- Improve yogurt consistency
- Reduce batch variation
Do not adjust pressure without a specific objective.
Step 2: Confirm Material and Process Conditions
Record:
- Product type
- Fat content
- Protein / total solids where relevant
- Feed temperature
- Flow rate
- First-stage pressure
- Second-stage pressure
- Upstream process condition
Without these values, it is difficult to compare one trial with the next.
Step 3: Check the Homogenizer Before Changing the Set Point
Inspect:
- Pressure stability
- Homogenizing valve
- Seals
- Pump condition
- Abnormal vibration
- Leakage
- Product supply
If the machine has a mechanical problem, pressure adjustment will not fix it.
Step 4: Start From a Reasonable Baseline
For ordinary pasteurized milk, one practical starting point may be:
First Stage: 15–20 MPa
Second Stage: 3–5 MPa
Then adjust according to actual product performance.
For other products, use the machine manufacturer's recommendations and the product process as the baseline.
Step 5: Adjust in Small Steps
Do not make large pressure changes and then guess what caused the result.
Adjust gradually.
After each change, record:
- Pressure
- Temperature
- Product appearance
- Cream separation
- Viscosity
- Foam
- Stability
- Filling behavior
This creates a usable commissioning record.
A Simple Homogenizer Troubleshooting Table
| Product Problem | First Things to Check |
|---|---|
| Cream / Fat Separation | Actual pressure, pressure stability, valve wear, feed temperature, stage balance |
| Unstable Pressure | Product supply, pump condition, valves, seals, flow rate |
| Foaming | Air ingress, pump suction, tank agitation, pipe connections, deaeration |
| Yogurt Graininess | Fermentation, starter culture, formulation, heat treatment, cooling, then homogenization |
| Poor Mouthfeel | Product formulation, homogenization level, temperature, particle distribution |
| High Equipment Wear | Excessive pressure, valve condition, abrasive ingredients, maintenance interval |
The key point is that pressure is only one variable.
Common Homogenizer Adjustment Mistakes
Mistake 1: Running at Maximum Pressure
Higher pressure does not automatically mean better product.
Use only the pressure required to achieve the target product quality.
Mistake 2: Looking Only at Total Pressure
On a two-stage machine, first-stage and second-stage pressure both matter.
Mistake 3: Ignoring Temperature
The same pressure can produce different results at different feed temperatures.
Mistake 4: Adjusting Pressure Before Checking Mechanical Wear
A worn homogenizing valve cannot be corrected properly by simply turning up the pressure.
Mistake 5: Blaming Every Yogurt Texture Problem on the Homogenizer
Fermentation, formulation, heat treatment, cooling, and shear may be more important.
Mistake 6: Changing Several Parameters at the Same Time
If pressure, temperature, formulation, and flow are all changed together, you will not know which adjustment actually solved the problem.
What Should Be Recorded During Commissioning?
A simple commissioning sheet should include:
| Parameter | Record |
|---|---|
| Product | Milk / Yogurt Mix / Dairy Beverage |
| Batch / Production Date | Batch ID |
| Feed Temperature | °C |
| First-Stage Pressure | MPa |
| Second-Stage Pressure | MPa |
| Flow Rate | L/h |
| Product Appearance | Normal / Separation / Foam |
| Viscosity or Texture | If relevant |
| Storage Stability | Observation after holding |
| Adjustment Made | What changed and why |
This makes future troubleshooting much easier.
Instead of an operator saying:
“I think we used a little more pressure last time.”
you have an actual process record.
Conclusion
There is no universal homogenizer pressure that is correct for every dairy product.
The best setting depends on:
Product Target → Material Characteristics → Machine Condition → Temperature → First/Second-Stage Pressure → Final Product Performance
For ordinary pasteurized milk, 15–20 MPa first-stage pressure and 3–5 MPa second-stage pressure can be used as a practical starting point, but they should not be treated as fixed standards.
For yogurt and more complex dairy products, pressure should be adjusted together with formulation, heat treatment, fermentation, cooling, and product texture requirements.
The most useful rule is simple:
Pressure is a means, not the target. Define what the product needs first, then use the homogenizer to achieve it.
A good homogenizer setup is not the one with the highest pressure.
It is the one that delivers stable product quality with reasonable energy use, equipment load, and maintenance demand.

